6.
Know how to navigate and use your college library. You can access the library
on the home page. Librarians at FSU library can assist you with using
references and will show you how to add references to your reports if you do
not know how to do this.
http://library.fairmontstate.edu/
Make
Contact Sheets for this assignment and upload them in the appropriate drop box.
Remember: no more than 16 photographs per sheet and attach your metadata to
each photograph. Title the contact sheets. Add appropriate footers:
Google Images or obtain
picture images. Drop 8-16 of your choice in Contact_1 folder in Contact Archive
folder on your external storage.
Follow this tutorial to
create your first contact sheet:
How to Make Contact Sheets for this Class
There are many options available to a
photographer to make contact sheets. For this class, we will use Adobe Bridge,
Preview and Adobe Acrobat to pull together a contact sheet that you can use to
study your camera and your shots. Many professional photographers archive their
libraries in this manner. This is a successful way to learn how to take
professional shots and organize your picture libraries. Contact Sheets can also
be used to present a number of images to a client when the client needs to make
a final decision about which photographs to utilize.
1.
We will use Adobe Bridge, Acrobat
and Preview for this exercise. If your monitor is large enough to tile these
applications, tile them as your documents open. Start with Bridge. There is a
left sidebar that reveals the folders located on the hard drives of the
computer. Navigate to your pictures in your file.
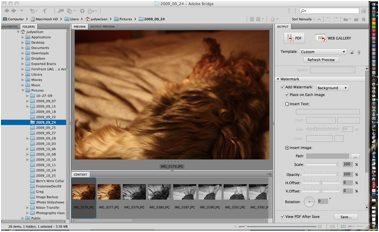
2. In the content bar located on the bottom
select up to 16 pictures with your command key if you wish to skip pictures. If
your selections are adjacent to one another you may select them with your shift
key.
3. With your selection chosen, on the right
sidebar select output, pdf, choose template 5*8 contact sheet. Then hit the
refresh preview button to preview your selection.
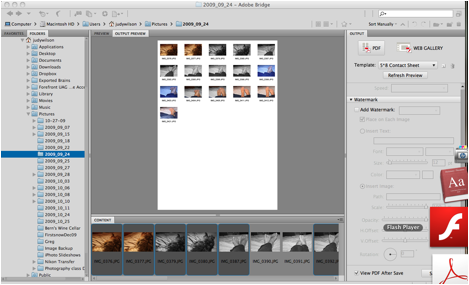
4. Under documents, on the right sidebar
choose the landscape button. In layout, set top, right, bottom and left margins
to .5 and columns to 4 and rows to 4. You may hit refresh preview button
anytime.
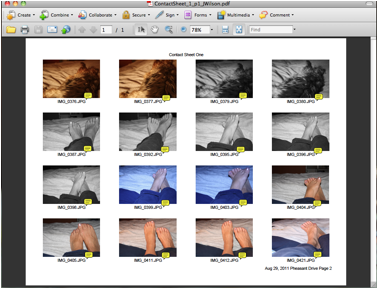
5. Continue on and add a header. Title it
"Contact Sheet One", so that you know it goes with Assignment One or
your first shoot. Center the header.
6. Then add a footer. Your footer should
contain your location and the date of the shoot. Also add a page number if you
are going to have more than one page. (Note: most likely you should. Your first
shoot covers the first four chapters of the e-book.) Right align the footer.
Add a watermark is optional- just know that
this is possible.
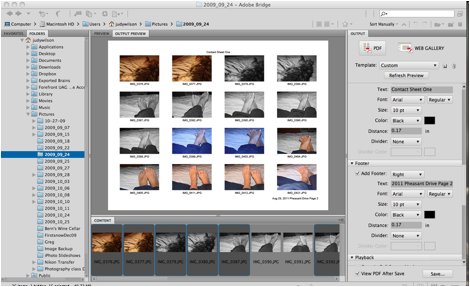
7. Check view the pdf after saving on the
bottom of the right sidebar and then click save. Save as
ContactSheet_1_p1_Yourname. You may save it and work from the desktop as long
as you remember to move your files to your external hard drive when you are
finished.
Your desktop should look similar to this:
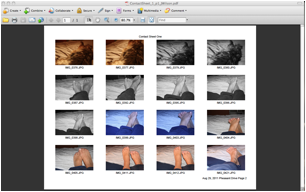
Minimize your pdf for now. You should be able to see Bridge with
your same selected files at this point on your desktop.
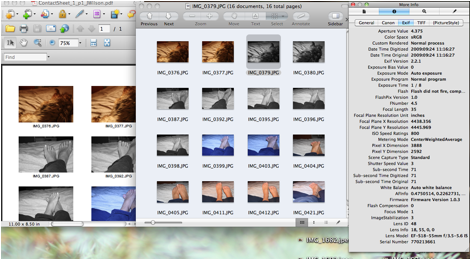
8. Right click on your selection and open
with preview. If you did this step correctly, every picture should open with
preview. You should see a list or thumbnails on the right, like this:
Scroll to the bottom of your right side bar
and select the contact sheet icon, so that all you see are thumbnails. Go to
tools and open inspector. Click on one of the thumbnails and in the inspector
box; reveal your metadata for your camera. What is metadata? Exchangeable Image
File Format that gives your camera settings at the time the photograph was
shot, EXIF. We will copy this particular information into our contact sheet so
that we can learn about our camera and it's particulars.
Tricky (on a laptop): Maximize your pdf of
your contact sheet now and arrange both windows and the inspector dialog box so
that you can view them at the same time, Like so:
9. You want to locate your first image on
your pdf in preview; then click on it in preview to reveal the EXIF in the tool
inspector. Once you have it, hold down and drag on the mouse until it is all
highlighted then go to edit in preview and select copy (command, c). Go back to
your pdf and click after the image title, right click, insert sticky note (you may choose to pre-insert all of
your sticky notes at once then edit them as you go) and click inside the dialog
box of the sticky note and right click paste (command v) text. You should have
something like the following:
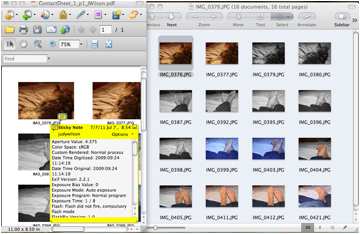
Minimize the note and make proper adjustments
to its location if needed. Do this step for all the thumbnails located on your
contact sheet and don't forget to save it. Close Preview and Bridge (If you
already haven't done so) without saving. Now you have quick access to the
information and only when you need it.
Save the PDF
to the appropriate folder for this assignment.
Out Lab #1 (DUE: 1/24)
Read your manual. Charge your battery ahead. Make sure you
purchased the proper storage card for your camera. Make sure your SD is
formatted with your camera. Set your image recording quality to jpeg high
setting. Do not shoot in RAW, unless you know how to convert RAW to .jpeg or
.tiff.
Take enough shots so that you have
some to choose from.
Review some compositional
rules either by researching online or reading your assignment before shooting.
The biggest challenge for most of us is to refrain from putting our subject in
the center of the picture or placing our horizon line in the middle of the
picture. So place your subject somewhere other than in the center of the
photograph and move your horizon line either down in the lower third of the
photograph or in the upper third of the photograph. Lock your focus by focusing
in on your subject, holding the shutter down halfway, then recompose the
photograph so that the subject is not in the center of the picture and snap the
shot. Be careful not to move forward of backward, just side to side, because
you are focused for your distance already.
Working with Automatic Settings on
Your Camera:
1- Everything Automatic
Automatic shoot
indoors morning, afternoon and night some with natural window light and some
with different light such as Tungsten, Halogen or Incandescent. Take at least
15 different shots.
2- Automatic Portrait
Setting: Do 10 shots of different people. Set your red eye if you have one.
3- Automatic Action
(Sports) Setting: 15 shots of different action- try throwing something like
feathers or leaves up in the air. Try taking a picture of a passing vehicle.
4- Automatic Close-up
Setting: 10 shots of little things like pennies or ants.
5- Automatic Landscape
Setting: 15 shots in the morning and late afternoon.
6- Automatic Night
Setting: 20 shots early evening, night and early morning.
7- Automatic Flash Off: Go to someplace like Brooks Gallery and
shoot about 10 paintings or subjects- whatever the gallery is displaying- make
sure it is in a gallery setting.
8- Automatic with
flash- Take about 5 shots of people or animals about 10 -15 feet away from the
subject in direct sunlight- outside in the afternoon bright sun.
In Labs #2 (DUE: 1/24), #3 (DUE: 1/31),
#4 (DUE:
2/7), #5 (DUE: 2/14), #6 (DUE: 2/21),
#7 (DUE:
2/28) Instructions apply until midterm
NOTE OF CAUTION: ALWAYS BACK
UP YOUR FILES ON A SEPARATE DRIVE OR CLOUD STORAGE SUCH AS DROPBOX.
1. Open
Bridge. Navigate to your folder on your removable storage. Hopefully you have
done your archiving before you came to lab today. If you haven’t done so,
please do it now. Remove your photos from your SD card or camera to your USB
archive folder we began in class.
2.
Choose 10 (or so) shots that you consider your
best and copy (opt drag) them in Midterm PSD Book/PSD_pp1_5/Resources / PageOne
folder after archiving them.
3.
Now select them all and go to File, Open with…,
Photoshop software (whatever version). If you created your PSD file already for
this project, PLACE the files into your Photoshop document instead (file,
place). If not, Create new file in Photoshop, choose your dimensions. If you
are printing your pamphlet, choose 300ppi. If you are submitting a coded
pamphlet or electronic pamphlet, set your resolution to 72ppi. I chose to set
my resolution high in case I decided I want to print it eventually- you can
always export print out for the web. Use sRGB for your color profile. It is
fairly standard and more versatile than other color profiles.
4.
Now, if you did not place the files, you have to
drag your open images into your new document and arrange them nicely on the
page and do what we graphic artists do best. So, grab the layer of the first
picture and drag it onto your new document- it should just drop right in with
transform handles, ready to be scaled. Be careful scaling up- you shouldn’t
have to scale up if you set your camera as instructed.
5.
Once you have all your photographs in place,
start adding some type. Do a block that contains your EXIF on one or so of the
pictures, a block that contains some information about where the picture was taken.
The blocks should contain some information about compositional rules or about
the particular camera settings you just studied.
6.
Once you have the document arranged the way you
like it, place the layers into a group by clicking on the group icons on the
bottom of the layers panel then placing the layers in the group folders (shift
select then drag). Rename the Group page one. See web page for examples.
7.
Save the document to your specific folder. Take
a screenshot and upload it to the appropriate assignment drop box. (Watch the
file size of the screen shot; reduce the ppi and the measurement before
uploading-easily done in PREVIEW.) You will do this for the next five labs. As
you get better at this, I expect you to do more than one page. You need at
least eight by midterm; because, you will need these for your midterm project.
Make sure these pages are cohesive to make a nice portfolio piece. Remember: as
you get better with the camera, you can swap out some of the images and
rearrange photographs if you leave them on their separate layers. Do not
flatten or merge the file and make sure you are saving it as a PSD file (Photoshop
file). We will do this when we
have accumulated enough pages to export the document out as a PDF or web pages.
Remember to keep this accumulated work BACKED UP.
The
book is a very short read, mostly pictures and diagrams and very
practical. Please read the
assignments and your camera manual and study the diagrams in the book to get a
better understanding of the following lectures. Click on READING ASSIGNMENT LINK above for book notes.
Journal Articles (DUE
TUESDAYS)
Write
a one-page report 12pt font default margins (two pages if you double space) on
each of the following topics. These reports should be submitted with cover
pages that show a date, title, your name and the assignment number. Edit your
work. I will be checking for accuracy, misspellings and grammatical errors. If
these reports are done correctly, your outcome will be a better understanding
of the importance of photography in your field of study. DO NOT PLAGARIZE. Give
credit by footnotes, bibliographies and quotes. Mark clearly where you quote
other artists' work. You may insert photographic work of photographers as long
as you subtitle their work and you may use your work to elaborate on technique
or procedures. Your paper can be longer than one page single spaced, but cannot
be shorter. You MUST have one page of typing without your examples. (READ ARTICLE
INSERT BEFORE BEGINNING):
http://www.robinurton.com/history/photography.htm
The following is a sample journal article
from a student that is well done. He did all of them cohesively and the same
throughout and did them well in advance of his deadline:
1.
What is camera obscura? Where did the term originate? What and who records the
earliest writings of camera obscura? Remember use your library and other
resources to write your report. Quote, footnote and provide bibliography for
your resources. Save the document as JournalOne_YourFirstandLastName and submit it as soon as
you finish it. (DUE: 2/5)
2.
When was the world's first photograph recorded and who took this photograph?
Why is the image difficult to decipher? Elaborate on heliography. Remember use your
library and other resources to write your report. Quote, footnote and provide
bibliography for your resources. Save the document as JournalTwo_YourFirstandLastName and submit it as soon as
you finish it. (DUE: 2/12)
3.
Who figured out how to permanently fix an image and what does this mean?
Remember use your library and other resources to write your report. Quote,
footnote and provide bibliography for your resources. Save the document as JournalThree_YourFirstandLastName and submit it as soon as
you finish it. (DUE: 2/19)
4.
When were light-sensitized paper and the box camera introduced and who gets
credit? How did this change the era of photography? Remember use your library
and other resources to write your report. Quote, footnote and provide bibliography
for your resources. Save the document as JournalFour_YourFirstandLastName and submit it as soon as
you finish it. (DUE: 2/26)
5.
What is photojournalism? Who is Matthew Brady and what does Timothy O'Sullivan
have to do with photojournalism? Remember use your library and other resources
to write your report. Quote, footnote and provide bibliography for your
resources. Save the document as JournalFive_YourFirstandLastName and submit it as soon as
you finish it. (DUE: 3/19)
6.
Research a career field that utilizes photography skills. How can you apply
your photography skills? Explain how archiving your own photography will help
in other areas of your degree? Remember use your library and other resources to
write your report. Quote, footnote and provide bibliography for your resources.
Save the document as JournalSix_YourFirstandLastName and submit it as soon as
you finish it. (DUE: 3/26)
7.
How important is it to understand the basic mechanics of a camera? Does looking
at the history help? Explain the basic mechanics and how looking at history
helps us understand our digital camera? Some terminology I expect to see in
this report: Aperture, Depth of Field, Shutter Speed, Lenses, Reflection,
Refraction and so forth. Remember use your library and other resources to write
your report. Quote, footnote and provide bibliography for your resources. Save
the document as JournalSeven_YourFirstandLastName and submit it as soon as you finish it. (DUE: 4/2)
8.
Explain three creative techniques of Photography that are considered innovative
and artistic, for example, surrealism, pinhole photography and "burning in
and dodging out." Please use analog photography here or historical
techniques for at least two of your techniques. You may use one current technique
such as HDR (High Definition Range). Remember use your library and other
resources to write your report. Quote, footnote and provide bibliography for
your resources. Save the document as JournalEight_YourFirstandLastName and submit it as soon as
you finish it. (DUE: 4/9)
9.
What is your favorite subject to shoot with your camera? How can you apply your
photography to your particular field of study? Are you willing to study further
and if so what are your plans? Remember use your library and other resources to
write your report. Quote, footnote and provide bibliography for your resources.
Save the document as JournalNine_YourFirstandLastName and submit it as soon as
you finish it. (DUE: 4/16)
10.
Write a tutorial that will explain to a layperson how to use aperture settings,
shutter speed settings and ISO settings together to get the best shot in a
particular environment. Remember use your library and other resources to write
your report. Quote, footnote and provide bibliography for your resources. Save
the document as JournalTen_YourFirstandLastName and submit it as soon as you finish it. (DUE: 4/23)
Out Lab #2 (DUE: 1/31)
Charge
your battery ahead. Make sure you have room on your external camera storage
card. Do you have prior shots stored on your USB storage? Then, you may
reformat your SD in your camera device. Use a tripod where necessary.
Working with Priorities
Take enough shots so that you have
some to choose from.
Review your manual for
your particular camera settings for a shutter priority, aperture priority, all
manual setting, depth-of-field setting and program AE (a setting that sets both
your f/stop and shutter speed). Read your book assignment (Part I), if you
already haven't done so, to refresh before setting out to shoot. Remember your
compositional rules. Review learning modules that cover the Exposure Triangle.
1-
Program AE
This setting will
set your exposure and shutter speed for you, so adjust other settings as you
move about shooting. Under low light manually turn on the flash. Move your ISO
levels according to your available lighting. At first this takes some guessing
until you are used to your camera and you know what it is capable of. After
pressing your shutter halfway, turn your adjustment dial to change your
aperture/shutter speed combinations. Program shift is cancelled after you
release your shutter and flash must be off to do this. The combinations will blink if ISO
needs adjusting or the flash needs turned on.
Take
20 shots in a variety of settings and different camera control combinations.
2-
TV: Action
This is the Shutter
Priority setting. These shots must have action. I want running water, passing
cars, sports shots, blowing trees in the wind or something like this. Please do
some outdoor water shots. We have a fountain on campus. Take shots there. Use
different ISO and flash combinations to obtain correct lighting balance and by
this time, you should be able to adjust your white balance. If not leave it set
on AWB (automatic).
Here you should freeze
the action in one shot and create motion blur in one similar. On my Canon, I turn the adjustment dial
to the right to set a fast shutter speed (which will freeze the action) and the
left for a slower shutter speed.
Take 20 shots in a
variety of settings and different camera control combinations. Also you may try
panning. Panning is also suggested in the Aperture Priority Mode.
3-
AV: Changing Depth-of-field:
This is the setting
that allows you to set your desired aperture and adjusts your shutter speed for
you. Recall the higher the aperture, the sharper the focus with wider depth of
field. So to narrow your depth of field, begin with a low f/stop setting. On my
Canon, I turn the adjustment dial to the right to increase my f/stop number. I
suggest you use a tripod while taking these shots. Experiment with telephoto
lenses now if you have them. Do not be concerned if you don't. Improvise. Don't
forget to make proper adjustments if your shutter speed is blinking. Make sure
to turn on image stabilization on your lens or camera body if you have those
options.
Take 20 shots of a
variety of items in different types of lighting particularly small and with a
variety of depth-of-field and if you are brave enough, you may try an outdoor
portrait like the one in the following website:
http://www.photonhead.com/exposure/simcam.php
4-
Manual Exposure
Use the prior
website to get a handle on how shutter speed and aperture settings work
together, then experiment with your manual setting and other camera controls to
do the following shots. Your manual setting on your camera can be used in
conjunction with a BULB setting that allows you to expose the picture for as
long as you hold down your shutter button. This is great for taking shots of
fireworks or night pictures. Of course, a tripod is a necessity. Here is where
a remote comes in handy. If you don't have these settings or materials, don't
overextend to get them. Just experiment if you do.
Take 20 shots of a
variety of settings in different types of lighting adjusting all settings on
your camera and record these in a notepad, so that you can remember what you
have already attempted. Be creative with your composition and show me style.
5-
A-DEP: Automatic Depth-of-Field
This setting
evaluates overall depth of field and attempts to focus the whole composition.
It is fairly effective. If the aperture blinks, it indicates the desired depth
of field cannot be obtained. All the subjects in the AF points that flash in
red in the viewfinder will be in focus.
Take 20 shots of
different subjects in a different settings experimenting with this setting. Try
shooting 2 -3 people together in this setting. Pay particular attention to your
AF points in your viewfinder.
Out Lab #3 (DUE: 2/7)
Charge
your battery ahead. Make sure you have room on your external camera storage
card. Do you have prior shots stored on your USB storage? Then, you may
reformat your SD in your camera device. Use a tripod where necessary.
1) Focus lock and Focus
Zones:
Experiment with
locking focus and adjusting AF Focus points on the camera, move your camera
slightly to the left or right (if necessary) to recompose.
Take 10 shots
practicing this of any subject you desire.
2) Create some noise!
Readjust your ISO settings starting from low, moving to high in both natural
light and low light (indoors or night). Then if your camera has a noise
reduction control, experiment with it on and off.
Take 10 shots that
show noise, and 10 shots of the same with reduced noise. In other words, do two
shots of the same scene, one with noise and the other with reduced noise.
3) Try applying the
traditional sunny 16 rule with the following digital changes:
http://www.photokaboom.com/photography/learn/tips/054a_exposure_sunny_16.htm
Traditional
Sunny 16 Rule:
You don’t need a light meter. You can set the
exposure using the Sunny 16 Rule.
In bright sunlight, set the lens opening to f/16
and the shutter speed to the reciprocal of the ISO.
An Example
You're photographing in bright sunlight. What's
bright sunlight? Use the shadows to evaluate the
brightness of the sun and sky. In bright
sunlight, shadows are dark with sharp edges. Let's say
you've set the ISO to 200. For the
correct exposure, set the lens opening to f/16 and shutter speed to 180. 1/180th is
the closest shutter speed to ISO 200. In other
lighting situations, use the table below:
|
Aperture
|
Lighting
Conditions
|
Shadow
Detail
|
|
f/22
|
Snow/Sand
|
Dark with sharp edges
|
|
f/16
|
Sunny
|
Distinct
|
|
f/11
|
Slight Overcast
|
Soft around edges
|
|
f/8
|
Overcast
|
Barely visible
|
|
f/5.6
|
Heavy Overcast
|
No shadows
|
|
f/4
|
Open Shade/Sunset
|
No shadows
|
|
Add One Stop
|
Backlighting
|
n/a
|
(http://en.wikipedia.org/wiki/Sunny_16_rule)
Experiment with these
combinations in manual mode. Take 30 shots.
4) Review panorama in your e-book. Apply your new
knowledge to the following assignment:
Take
3-5 horizontal shots moved about 60 degrees from left to right of beautiful landscape. Try this in different places at
different times of day. You will need these photographs to do In Lab_Panorama.
Have two separate scenes that you feel will stitch together well in Photoshop.
Here is an example from my point-and-shoot:

Example of a Panorama
Make a panorama in
Photoshop Thursday by following this tutorial:
http://tv.adobe.com/watch/learn-photoshop-cs5/creating-a-panorama/
5) Proper Metering Modes (Read the following article
insert to get a better understanding): Review your camera manual to find meter
mode controls and shoot 5 different shots changing the metering modes and
shooting in the appropriate environment to demonstrate the difference the light
meter can make. Do some before/after.
Digital Camera Metering and Metering Modes
(http://easybasicphotography.com/digital-camera-metering-modes.html)
A key element in taking pictures is obtaining a
correct exposure reading. In other words you don't want your picture to be too
dark or too light. All digital cameras are equipped with built in light meters.
The camera's light meter reads the luminance (brightness or radiance) of light
being reflected from a scene or subject. Please note that camera light meters
are only reading the radiance or brightness of the light and not the color of
the light.
In order to reproduce that same luminance in an
image, the camera's metering system is programmed to assume that an average
scene is reflecting about 18% of the light in it. Specifically, reflected light
from a middle tone of gray (halfway between black and white) is used as the
standard. So when you manually set your camera's aperture and shutter
speed to obtain the correct exposure value, they are being set so that the
overall reflected light from the scene will be recorded and reproduced in the
image somewhere in a mid-tone range. The same thing happens when the camera is
used in the automatic exposure mode.
Another thing you should know about light meters...if
you are taking a picture and something white like snow dominates the scene, the
camera meter will assume it is too bright and set an exposure value to try and
make the snow darker or in a mid tone range. The whole picture will be
underexposed. The reverse is true if you are photographing something that is
predominantly dark or black. The meter will assume it is too dark and suggest
an exposure value to lighten it so that it records more in the mid tone range.
In those type cases, you will have to use your camera's exposure compensation
feature or manually adjust the aperture and shutter speed.
Digital camera light meters are a great tool but
all lighting situations are not the same and certain metering modes will work
better under certain lighting situations.
The following is a summary of the most common
digital camera metering modes. Digital SLR camera users are able to manually
switch between the metering modes listed below. Compact camera users may have
one or more of the following modes in their cameras, but might not be able to
manually change between them.
Center
Weighted Average
This metering mode assumes that the main subject is
located somewhere in the middle of the frame. When calculating a proper
exposure, the camera meter will concentrate on, and give the most weight to a
60-80% area of the middle of the frame. The light readings for the remaining
areas around the frame are also taken into account and averaged in with the
rest of the scene, but are not given as much weight.
So the center weighted average mode will be less
influenced by very bright or very dark areas around the edges of the
viewfinder.
The pictures to the right show an approximate area
for a center weighted metering image and the resulting image.
The center weighted average mode is included in
just about every compact and Digital SLR camera and works well in most average
picture taking situations. That is provided there are no extreme contrasts
of light in the main area that is being metered.
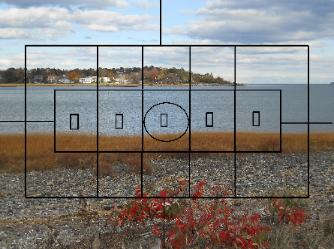
Evaluative or
Matrix Metering Mode
The evaluative or matrix metering mode measures
light in multiple areas of the entire frame. (It is also know as pattern
metering) These areas are called zones and are analyzed individually. The grid
below shows an example of how a sixteen zone focusing area might look. The
five very small rectangles across the middle are the focusing points. The
number of zones in a camera might be fewer than sixteen or sometimes a great
deal more. The exact method of calculating the exposure value from the readings
in these individual zones can vary from camera to camera.

Some of the factors taken into account when the
exposure is being calculated are the areas at the auto focus points, the
distance and position of subject. In or out of focus areas as well as background
and foreground brightness is also considered in the exposure calculation. The
light readings taken from the scene are averaged out and are also compared to
thousands of images stored in the camera's database of typical pictures. The
camera will then set an exposure that is typical of the scene being taken. That
method works well for a typical scene like the one above. Yes, you could say
there is some guessing in this equation, but the evaluative mode works well in
most situations and is more accurate than the center weighted mode. The only
problem is that you don't always know what areas in the frame are carrying the
most weight in the calculations, so you might get unexpected results every now
and then.
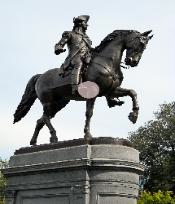
Spot Metering
or Partial Metering
The light meter will take a reading from a small
area or spot of the frame when you use the spot-metering mode. This area might
be 1-5% of the viewfinder area and it is usually in the center of the frame,
however, some advanced cameras might offer multiple spot metering areas within
the frame.

Partial metering works basically the same as spot
metering but will cover a slightly larger area or spot in the frame.
The photo of the statue on the left was originally
taken using the center-weighted mode. The statue is too dark with not enough
detail. The spot in the picture on the right shows the approximate area that
might be used in the spot-metering mode. The picture on the right shows results
after spot-metering. Please note that in this case the exposure value had to be
adjusted to EV-1 because the metered area was very dark and without the EV-1
adjustment, the overall picture
would have been too light. Spot metering consists
of taking a light reading from a very small area in the viewfinder while
basically ignoring the light readings from the remainder of the frame.
Spot metering is good to use in back lit situations to keep the subject from
being underexposed. Spot metering will give a more accurate reading for a
particular subject in an image, however, there is always the possibility that
the other areas in the frame will be overexposed or underexposed. That is, if
the overall lighting in the frame is not even.
So spot metering is best used when the main subject
needs to be properly exposed more than anything else in the frame.
Out Lab #4 (DUE: 2/14)
Charge
your battery ahead. Make sure you have room on your external camera storage
card. Do you have prior shots stored on your USB storage? Then, you may
reformat your SD in your camera device. Use a tripod where necessary.
The Rules of Composition
1) Isolate the Focal Point: Decide what the subject is and focus on
it.
What
is a secondary focal point? When the focal point of interest fills the
photograph, the secondary focal point is the subject that breaks up the
monotony.
2) Rule of Thirds
Where are the sweet spots? What are sweet spots?
3) Focus Off-Center:
■ Use focus lock Virtually all digital cameras have a two-step shutter
release—press lightly on the button (so it only goes half-way down), and
you set in motion a series of events in which the camera prepares to take the
picture. Most importantly, the camera measures the distance to the subject in
the autofocus zone (usually the center of the viewfinder) and locks focus. As
long as you keep some pressure on the shutter release, you’re now free to
reposition the camera and compose the shot any way you like. When the scene is
composed to your liking, just press down the rest of the way to capture the
photo. Focus lock is a common and powerful way to lock the focus on a person,
and then recompose slightly to put him or her in the rule of thirds sweet spot.
■ Use focus zones many cameras—especially models with multi-segment
metering (see Chapter 3 for an explanation of that)—let you control what
part of the viewfinder is used as the focusing zone. Instead of focusing from
the center and using focus lock to recompose the shot, you can use a control on
the back of the camera to tell the camera to focus using a zone on the right,
left, top, or bottom of the viewfinder, like the ones depicted in the following
viewfinder illustration. That way, you never need to focus lock and recompose.
Just set the active focus zone over the subject and take the shot. With
practice, you can change focus zones using your thumb without ever looking away
from the scene in the viewfinder.
What
do you have to be careful with if you are using focus lock? Focal distance- the
photographer can not twist or torque his or her body before pressing the
shutter release.
4) Fill the Frame? What does this
mean? Limit empty space, unless the empty space is part of the message.
5) Move the Horizon
Where
should the horizon line be if you are taking a seascape? Top one third of the
photograph.
Where
should the horizon line be if you are emphasizing the sky? Bottom one third of
the photograph.
What
is the golden rule that applies to these two questions? Rule of Thirds
6) Use lines, symmetry and patterns
What
do lines symmetry and patterns add to a two-dimensional shot?
Perspective,
sense of depth, a viewer's path, artistic quality and balance
7) Tell a story. What is
photojournalism? The photograph can stand by itself and tell the story without
the viewer reading additional information about the incident.
8) Know when to Break the Rules.
Perspective-
change the position of the viewfinder as well as your position, for example
stand on something or squat.
Ignore
symmetry- What is this change called? Asymmetrical balance. What does it create
for a story? Disruption, Drama and sometimes Tension.
Surprise
the viewer- Take a common shot and add a twist, for example frame the window or
door as well as what you see through the door.
Add
additional focal points- What is a good way to maintain interest of a
photograph that has several focal points? Make another compositional rule
dominant in the photograph; for example, create a line or geometrical pattern
for the viewer's eye to follow.
9) Emphasize depth of field
Define
depth of field: The region of proper focus that is available to the viewer of
the photographic image.
What
are the factors that determine the depth of field?
Aperture,
focal length, and the distance the photographer is away from his or her subject
The
focal length of a telephoto lens is a ___________angle of view compared to the
focal length of a 35 mm lens and a fish-eye lens, which have a______________
angle of view.
What
additional piece of equipment is necessary when using a telephoto lens? Tripod.
Shoot 10 photographs for each rule,
excluding #8. I want 20 for #8. I am giving a great deal of leeway here, so
that you can apply some artistic ability to these photographs. Keep your final
portfolio in mind as you shoot these.
Tutorial
Suggestions:
http://tv.adobe.com/watch/learn-photoshop-cs5/gs02-straightening-a-crooked-image/
Review
the following ideas for your final portfolio:
(Careful with this one-
just the PSD file-not converted to html and set up more like a front page on an
entire website)
http://www.1stwebdesigner.com/tutorials/portfolio-psd-photoshop-tutorial/
(same with this one)
http://www.grafpedia.com/tutorials/2073
(interesting read from a photographic
artist’s perspective)
http://www.luminous-landscape.com/columns/portfolio-8.shtml
(getting started with photo
galleries)
http://www.youtube.com/watch?v=hEdp0dI1VGU&feature=related
Out Lab #5 (DUE: 2/21)
Charge
your battery ahead. Make sure you have room on your external camera storage
card. Do you have prior shots stored on your USB storage? Then, you may
reformat your SD in your camera device. Use a tripod where necessary.
Working with Flash, Filters
and Reflections.
FLASH
AND LIGHTING
Two ways to use flash-
As the main source of lighting
As a secondary source to fill in
shadows
Range of Flash- Maximum range is
about 20 feet for a built-in.
Minimum range is about 3 feet for
a built-in
Settings for a built-in flash are
typically:
Off
Auto
Forced
Red eye
When using a flash for fill, what
other setting does a professional photographer typically change?
The
intensity of the flash can be reduced on professional cameras in bright light.
What
is rear curtain sync? Adjustment made to the flash so that it fires at the tail
end of the exposure-also called______________.---slow sync. What do
photographers typically use this setting for? To make a proper adjustment on
moving lights at night
What
is a mount called that is located on a camera body that holds an external flash?
Hot shoe.
What is a Slave Flash? External flash
unit with a built-in light sensor firing at approximately the same time as your
digital camera’s built-in flash unit.
Define Reflection: The act of light
moving off of one subject and onto another.
Reflection
can take the place of what to a photographer?________-- an external flash.
Ways
to provide reflection onto your subject in bright light?
Wear
a bright white tee shirt.
Use
white poster board
Purchase
Litediscs.
Move
the subject next to something that already provides reflection, for example,
water.
Why would a photographer want to use
reflected light over an external flash?
--Looks
more natural
What is another common use for a
posterboard or Litedisc when using it outdoors? Block a breeze to prevent the
wind from moving your subject.
What
is the biggest hurdle to overcome with indoor photography? --The color change
in light.
When does red eye typically occur? --When
the pupils of the subject are dilated.
Steps
to take to reduce red eye-
Use
red eye reduction mode on your digital camera
Use
an external flash off-camera: situate the external flash to the left of the
camera or to the right but never where the light can reflect back into the
camera lens.
Find
natural light sources and try to take the picture near them.
1) 10 photographs where flash is the primary source of
lighting.
2) 20 photographs where flash is the secondary source
of lighting.
3) 15 photographs where lighting has been reflected
onto the subject to soften a shadow.
4) 5 photos changing red eye reduction and built in
flash settings.
Tutorial Suggestions:
Flash lighting
http://photo.tutsplus.com/tutorials/lighting/10-ways-to-shoot-stunning-portraits-with-only-one-light/
http://www.apple.com/findouthow/photos/ -
redeye
You just finished a tutorial in Iphoto? Did you notice
the site has other helpful tutorials? If you complete some of these tutorials,
It will assist you with your final portfolio project.
Here is a helpful Photoshop site that you may use to
reduce your red eye if you prefer Photoshop:
http://help.adobe.com/en_US/photoshop/cs/using/WSfd1234e1c4b69f30ea53e41001031ab64-7601a.html
Use the following link to learn more about editing in
Photoshop CS5:
http://help.adobe.com/en_US/photoshop/cs/using/index.html
Out Lab #6 (DUE: 2/28)
Charge
your battery ahead. Make sure you have room on your external camera storage
card. Do you have prior shots stored on your USB storage? Then, you may
reformat your SD in your camera device. Use a tripod where necessary.
White Balance
What
is the biggest hurdle to overcome with indoor photography? --The color change
in light.
Why
does a digital camera come equipped with a white balance option?
Light
sources have different color temperatures depending on how it is illuminated.
When
in a difficult setting where the photographer is having trouble adjusting his
or her white balance what picture mode should the photographer switch to? The
camera's RAW mode, if he or she has this option. Why? --White balance can be
easily adjusted on the computer after the pictures are transferred onto the
hard drive.
What
are the typical modes for white balance on a camera?
Incandescent
lights, fluorescent lights, external flash unit, overcast, cloudy and bright.
How to set White Balance manually:
Press
the menu button, advance to white balance, scroll through the options and
select the best suited for the environment, then press menu until the screen
returns to normal view. (Maybe twice)
White balance can be manually
adjusted with a ___________ or______________ ____________. --White or gray
card.
How?
Have your subject hold the card in place while you get to your camera settings
where you can record the balance yourself. Once there fully focus in on the
card and press the shutter to record the white balance, then exits the menu.
There are also ExpoDiscs that are in the form of a filter, which fits over the
lens that once snapped in place, the photographer takes the reading and removes
it before shooting.
You may experiment with manually setting your white
balance, but it is not required for this assignment. Show before/after.
1) 10 Photos in Tungsten Lighting, adjusting your white
balance.
2) 10 Photos in Incandescent Lighting, adjusting your
white balance.
3) 10 Photos in Shade, adjusting your white balance.
4) 10 Photos in Cloudy weather, adjusting your white
balance.
5) 10 Photos with the flash on, adjusting your white
balance.
Suggested Tutorials:
Camera
Raw to adjust white balance during post processing:
http://tv.adobe.com/watch/photoshop-cs6-featuretour/adobe-camera-raw-70-in-photoshop-cs6/?go=12414
Working
with Preview:
http://www.apple.com/science/productivitylab/
- previewworkflow
More on iPhoto:
http://www.apple.com/findouthow/photos/ -
exposure
http://www.apple.com/findouthow/photos/
- books
NOTE: YOU DO NOT HAVE
TO BUY ANYTHING HERE
Out Lab #7 (DUE: 3/21)
Charge
your battery ahead. Make sure you have room on your external camera storage
card. Do you have prior shots stored on your USB storage? Then, you may
reformat your SD in your camera device. Use a tripod where necessary.
Night Photography
What is the biggest shortcoming of
most digital cameras that prevents the photographer from extending his/her
library of night or low light shots? Limited shutter speed settings or no way
of taking the desired shot because the camera is not capable of long exposure
time. How can we compensate for this shortcoming? Using the widest aperture
setting, a tripod and adjusting the ISO to a larger number and working with
flash and its particular settings. BULB setting if your camera has it.
A camera with a bulb setting allows
you to do what? Hold the shutter release down to acquire as long an exposure as
you need usually up to 8 seconds.
What should a photographer do if
he/she wishes to shoot with a long exposure time?
Use
a wireless remote control for his/her shutter release or use the self-timer on
the digital camera.
Why?
Prevent camera movement or shake.
What is EV? Can it be used for night
photography? Explain.
Exposure
meter adjustment that is set up by bracketing on a digital camera that allows
the photographer to adjust his/her aperture setting or f/stop number without
changing any of the other settings of the camera. To use the setting for night
photography, adjust it by moving it down a few brackets to overexpose the
photograph.
What
is noise and how do we minimize it?
Noise is granular dots that show up
on a final photograph usually caused by a high ISO setting or long shutter
speeds. To minimize noise, keep the shutter speed as short as possible, use
noise reduction features if the camera is equipped with them, or eliminate
noise reduction in photo editing software (as a last resort).
Experiment with bulb setting, tripods
and exposure bracketing for this assignment. Remember where your noise
reduction controls are located? How do you set your ISO?
1) 21 photos at night of your choice
with EV bracketing, so 7 different scenes.
2) 29 photos experimenting with a
wide aperture and tripod, bulb setting if you have the feature, and ISO change
and noise reduction.
3) EV Bracketing for
HDR (High Definition Range). Review this tutorial so that you have a better
understanding where you might need these photographs in the future: http://tv.adobe.com/watch/learn-photoshop-cs5/indepth-hdr-pro/
Choose an area where
there is great contrast between light and dark tones. Bracket your exposures
until one is over exposed and another under exposed. Have about 5 bracketed
pictures to work with in Photoshop. Be careful not to move your camera while
shooting. Use a sturdy tripod.
Do 2-3 scenes of 5
bracketed pictures each.
In Lab #8 (DUE 3/21)
Start
experimenting with Web Galleries. Use Adobe Bridge to start. Place your web
pictures into a separate folder before you start and navigate to that particular
folder, select the photographers and in output press the web gallery button
instead of the pdf button. Explore the Internet for other options. Also begin a
new PSD document for your final web page portfolio. Choose resolution for the
web and an appropriate size for the web page. If you are unsure use the default
settings for a web page. Take a screenshot at the end of the session of your
PSD web page in progress and upload it to the appropriate assignment dropbox.
Use
the following link to finish your HDR photographs:
http://tv.adobe.com/watch/learn-photoshop-cs5/indepth-hdr-pro/
Upload your finished
photograph(s) to the appropriate drop box for this assignment.
Try this Gallery Tutorial:
http://tutorialzine.com/2012/04/mobile-touch-gallery/
Night Photography Basics:
http://www.ephotozine.com/article/introduction-to-night-photography-4717
Out Lab #8 (DUE: 3/28)
Charge
your battery ahead. Make sure you have room on your external camera storage
card. Do you have prior shots stored on your USB storage? Then, you may
reformat your SD in your camera device. Use a tripod where necessary.
Macro Photography
Close-up
Photography
Close-up photography is also known
as_______________ photography.
Macro
Look for the ______________ to set
your camera to shoot a macro photograph.
What is an extension tube? It is a
tube that is placed between the lens and the camera body to allow the
photographer to shoot with greater magnification. (It is not needed for your
assignments)
What is a reversing ring? Glass lens
that fits between the lens and the body camera to provide the photographer with
a better macro effect than what the lens can provide by itself.
What common problem does point and
shoot cameras have with macro photography?
Parallax:
what you see in the viewfinder is not quite what gets photographed.
How
do photographers deal with parallax when shooting with a point-and-shoot?
Camera
comes with close-focus marks, correction marks or parallax marks that guide the
photographers as how to shoot with the particular camera.
You should not need to purchase snap
on macro or screw on macro filters for your assignments for this class, but if
you have them, experiment with their variations.
A____________
tripod works well with indoor macro photography. --Miniature
Use a ___________ lens and a
______________ tripod for outdoor macro photography. --telephoto and sturdy
Why would a photographer use a
beanbag? Beanbags are pillows of little beans that have a tripod screw on the
end that can be attached to the bottom of a camera body to provide
stabilization for the camera while the photographer takes a picture so that
camera shake is avoided.
What
are the three determining factors of macro depth of field?
Distance,
Aperture, and Light.
What line of sight takes a better
macro picture (typically)? --Parallel
What's a great way to diffuse a
flash? Photographer's Gel or cover it with a white tissue.
What's
a plamp? --clamp made specifically for a tripod to hold a subject still.
I don't think it's necessary to
experiment with flash while attempting macro photography closer than a couple
of feet. Why? Blockage. What is that? Lens is in the way of light emitted from
the flash. Other reasons? Most cameras will not let the flash fire in the macro
setting. You may experiment on your own, but it is not required for our
assignments.
Why do photographers use light domes
or tents? To keep light from reflecting off of the subject back into the camera
lens
1) Experiment with a variety of these techniques. Remember
what you've studied about depth-of-field and wide apertures. Use your tripod
and different lenses (and filters if you have them). Take a variety of shots of
different subjects. Shoot 50 photographs.
(Make sure you have some similar shots of the same scene but slightly different
(Maybe the subject has moved slightly, or the exposure is different, etc.)
In Lab #9 (DUE 3/28)
Add
the macro photographs to your archive just as you have been doing and
incorporate these into your final web page gallery folder. Take a screenshot at
the end of the session of your PSD web page in progress and upload it to the
appropriate assignment dropbox.
Suggested
tutorial on composite out of two similar photographs:
http://tv.adobe.com/watch/adobe-evangelists-terry-white/fix-a-family-photo/
Designing a Website
Template or Page to be exported out of Photoshop and into Dreamweaver for
coding:
http://creativenerds.co.uk/tutorials/70-tutorials-using-photoshop-to-design-a-website/
Slicing up a Photoshop
Page to export to Dreamweaver:
http://www.youtube.com/watch?v=DVfxe4pqvo8
http://designshack.net/articles/graphics/how-to-make-slicing-suck-less-tips-and-tricks-for-slicing-a-psd/
Slicing
beyond the mockup:
http://www.bolducpress.com/tutorials/from-photoshop-to-html/
Out Lab #9 (DUE: 4/4)
Charge
your battery ahead. Make sure you have room on your external camera storage
card. Do you have prior shots stored on your USB storage? Then, you may
reformat your SD in your camera device. Use a tripod where necessary.
Action Photography
What is the biggest complaint among
photographers who take action shots? Shutter Lag.
What is shutter lag? It is the pause
between when the shutter button is pressed and when the final picture is taken.
What are remedies for shutter lag?
pre
focus or focus lock if camera does not automatically disable when in Shutter
Priority Mode
Set
your white balance according to the environment
press
the shutter in advance
Experiment
with Continuous Fire or Burst mode on your camera settings
Pan
your action
___________ mode was created
specifically to freeze action. --Shutter Priority
What are two common symbols that
represent Shutter Priority on digital cameras? A or TV
What's happening with the shutter
speed if the photographer cannot bump it up to the fastest shutter speed that
is available to his/her particular camera?
The
available lighting is not strong enough, so the photographer can bump the light
sensitivity of his/her image sensor by increasing his/her ISO rating.
Pan
for Action
_________________
captures the subject in good, sharp focus, while holding the background as a
motion blur. --Panning
1) Remember what you studied about the Exposure Triangle,
focus lock and shutter speeds. Take 50 shots of a variety of action
experimenting with continuous fire or burst mode on your camera. Try panning.
In Lab #10 (DUE: 4/4)
Add
the action photographs to your archive just as you have been doing and
incorporate these into your final web page gallery folder. Take a screenshot at
the end of the session of your PSD web page in progress and upload it to the
appropriate assignment dropbox.
Suggested Tutorials:
Handling Action:
http://www.youtube.com/watch?v=vUd77mZgr1Y
A Dreamweaver
CS6 Web Gallery Tutorial from Inspire:
http://www.adobe.com/inspire/2012/10/ten-steps-dreamweaver-cs6.html
Some gallery tutorials (Learn to code these
yourself-Don’t buy anything!):
http://net.tutsplus.com/articles/web-roundups/50-excellent-image-galleries-you-can-use-today/
Out Lab #10 (DUE: 4/11)
Charge
your battery ahead. Make sure you have room on your external camera storage
card. Do you have prior shots stored on your USB storage? Then, you may
reformat your SD in your camera device. Use a tripod where necessary.
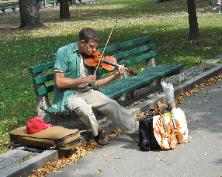
Photojournalism
Review your journal articles
for information on photojournalism.
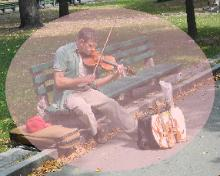
1) Take 16 photographs that tell a story solely by
viewing them.
Career Paths
Review your journal articles to understand Career Paths
that are available to photographers.
2) Take 16 photographs that demonstrate a career path
that you may take with your photographic experience. You may edit these in
Photoshop before submitting them.
3) Experiment with your video on your camera if you
have this option. Stay within the same theme as your career path or your
photojournalism.
In Lab #11 (DUE: 4/11)
Add
the journalism photographs or videos to your archive just as you have been
doing and incorporate these into your final web page gallery folder. Take a
screenshot at the end of the session of your PSD or web page.html in progress
and upload it to the appropriate assignment dropbox.
Suggested Tutorials:
More Gallery Options:
http://vandelaydesign.com/blog/web-development/jquery-image-galleries/